CentOS Proxy Configuration
It took me a while to figure this out, being used to Windows and having IE generally used as a central repository for proxy settings, I was looking for something similar in CentOS. I am afraid in this case, as far as I can make out, proxy settings are mostly application specific. That said I believe there are locations that are apparently meant to be used for central proxy configuration and programs should try to get the proxy info from them. The central locations are split between GUI programs and command line programs.
So in this post I show how to configure the proxy settings in 4 locations, 2 of which are “apparently” central locations for other programs to use and the other 2 are program specific (as they seem to ignore the central settings). The 4 locations are
- Gnome Proxy (used by GUI programs)
- Proxy Environment Variables (used by command line programs)
- YUM (Software updater and installer)
- Firefox (Web browser)
Gnome Proxy setting
The Gnome desktop interface provides proxy configuration settings and apparently a lot of GUI programs will use this settings. This said, I am afraid these settings need to be changed for each user. (I can’t remember where I cam across this information and if it wrong maybe someone can let me know and I will update this.)
Gnome-Desktop proxy settings can be changed from a GUI tool or you can edit the file directly. The image below shows where to find the GUI tool under
System –> Preferences –> Network Proxy
 You can edit the proxy settings here. I have a proxy configuration file available so I have set the automatic proxy config setting, however you can set the proxy manually here as well. The advanced tab allows you to specifically define addresses to ignore the proxy for (i.e. the local subnet).
 When using this GUI tool Gnome stores the proxy config settings in the following folders and files. ~ indicates the users home directory and the . hides the folder or file(see notes below for further explanation)
~/.gconf/system/proxy/%gconf.xml (used for the manual and advanced settings)
~/.gconf/system/http_proxy/%gconf.xml (used for the automatic settings)
I can’t tell you why it is split into two files but it appears to be so.
Proxy Environment Variables
Like the Gnome proxy settings above, the Environment variables are apparently for Command Line programs to provide a central area that these programs can look to for proxy config.
There are a number of proxy environment variables but I will concentrate on just 3 that apply to my network setup. These are
- http_proxy
- https_proxy
- ftp_proxy
I think these are pretty self explanatory.
To set these there is no GUI (that I am aware of), so we have to go to the command line. We need to fire up Terminal this is found in
Applications–> Accessories –> Terminal

The terminal should start in the users home folder ~ (see notes), you should see a prompt like this
[<username>@<machine_name> ~]#
or
[<username>@<machine_name> ~]$
<username> should be the logged on user
<machine_name> should be the computer name you are on.
The # or the $ is dependent on whether you are logged in as a user or root. # indicates root, $ indicates normal user.
We can set the environment variables at the command prompt by typing
http_proxy=”http://<proxyserver>:<proxyport>”
Now the same applies to the other environment variables. However at the moment these environment variables are only valid within this particular Terminal session. If we were to fire up another program or terminal session theses environment variables would not exist in their scope. So to make the environment variables global we need to export them, this is done using the export command. We can export any number of variables by separating them with a space.
export http_proxy https_proxy ftp_proxy
Another issue here is that this is not a permanent change, if we reboot these variables will be lost. So to get around that we need to change a log on script called profile. The script is found here
/etc/profile
OK, so how do we edit a file? I am going to give a brief introduction to vi (mainly because I have only just got my head into it) and some basic bash commands.
So in the terminal window change directory to /etc/.
To get to this directory use the following bash commands
CD / (will take you to the root directory)
CD etc (will take you into the /etc directory)
Now we are in this folder, we can use the following command to list the contents..
ls
In the list of files and folders you should see the file profile listed.
OK now type
vi profile
This puts us into the vi editor, a command line text editor. Now I found this a bit weird a first but I am gradually getting the hang of it. The editor opens up in a mode called command mode. It will allow you to scroll up and down, but not allow you to modify text. This is where you have to change modes, in this case we want to go to insert mode. This can be achieved by hitting the escape key and then i or a
<esc> a/i
You should see at the bottom of the terminal window that – INSERT – appears, to indicate you are in INSERT mode. You can now modify the file. To quit out of this mode hit <esc> at anytime (—INSERT –) should disappear from the bottom of the terminal window.
OK so now we need to enter some the commands to set the variables. So somewhere in the profile file enter the following.
http_proxy=http://<proxyserver>:<proxyport>
https_proxy=$http_proxy
ftp_proxy=$http_proxy
export http_proxy https_proxy ftp_proxy
In my case the same proxy handles http, https and ftp. My script therefore sets the http_proxy variable and then sets the others to the http_proxy value. If you have different settings for https and ftp get rid of the $http_proxy and replace with the direct setting (as with the http_proxy above). Once these have been set I then export the variables to make them global.
OK so we need to save the file by issuing the write command. Hit escape and enter :w <enter>
<esc> :w <enter>
The bottom line should change to show something like
"profile" 60L, 1062C written
Now we have saved the file, we need to quit the editor. The quit command is
<esc> :q <enter>
While using the editor you may find you want to quit without saving, although you have made changes. Now if you just issue the command above it will complain that there are unsaved changes. so to quit without saving changes you can force it by typing
<esc> :q! <enter>
In addition you can combine commands, so to quit and save type
<esc> :wq <enter>
You should now reboot.
You can test that the changes have worked by firing up the terminal (as above) and typing the following command
echo $http_proxy
You should get the value you set in the profile file. The same applies to the other variables if you want to check them.
YUM - Software Updater and Add/remove Software - Proxy Setting
There are two locations within CentOS GUI to run software update tools (software updates and software installations). These are
- Applications –> System Tools –> Software Updater
- Applications –> Add/Remove Software

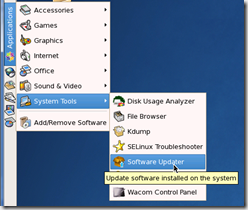
They both run the same underlying command line application YUM (Yellowdog Updater, Modified) but the Software updater allows for installed software (packages) to be updated, where as the Add/Remove Software option will allow you to add and remove software (packages) from defined repositories. (Repositories are locations on the web/network that software packages can be downloaded/updated from, CentOS comes with a set of predefined repositories but you can add custom repositories when needed).
Now the proxy setting for YUM cannot be configured within any of the GUIs, it has to be done within the configuration files. I will quickly go through this, but it will involve using the vi editor, I will not explain the commands here please see the previous section on environment variables for more details on the each command.
The YUM configuration is yum.conf and is found in /etc/
/etc/yum.conf
Enter the vi editor
vi /etc/yum.conf
enter insert mode
<esc> i
find the line that says proxy= and change it to your proxy server settings, if your file does not contain this setting just add it in the first clear line in the [main] section.
proxy=http://<proxyserver>:<proxyport>
Quit and save vi.
<esc> :wq
Now fire up either the Software updater or the Add/Remove Software. You should find that both tools are able to connect to the defined repositories. you can install any updates you require.
Firefox – Proxy Settings
Now I talked about GUI programs respecting the Gnome proxy settings and I believe Firefox does. I really only include this here as a FYI (I messed with the settings when I was trying to work out what was going on with all the proxies). It appears that the default for the proxy settings in Firefox is to “Use System Proxy settings” which means it looks for the Gnome settings. So if you make the changes above you should not have to worry about this.

Open up Firefox and select preferences
Edit –> Preferences

In the advanced section, under the network tab, click settings


Once in Connection settings you can change the your proxy settings.
Notes
- The folder ~ is actually a shortcut referring to the logged on users home folder (you can see why the setting must be configured for each user). The physical user home folder can be located here /home/<username>.
- The . on the beginning of the file or folder name is a way to hide the file or folder from normal folder browsing.
Other parts in this series

Part 3 - CentOS Proxy Configuration


